|
|
S u m m a r
y |
|
Catalogue Number and Description |
Aires Hobby
Models 4247 - F4U-1 Birdcage Corsair Cockpit Set |
| Price: |
USD$20.46 available online from Squadron |
| Scale: |
1/48 |
|
Contents and Media: |
Grey and cream coloured
resin, acetate film, photo etched metal |
| Review
Type: |
FirstLook |
|
Advantages: |
Excellent detail and casting;
|
|
Disadvantages: |
No painting
instructions |
|
Recommendation: |
Recommended
|
Reviewed by
Rodger Kelly

Aires' 1/48
scale F4U-1 Corsair Cockpit will be available online from
Squadron.com
The latest
addition to the Aires Masters Series is 4247, a 1/48 scale mixed-media
kit cockpit set for the 1/48 scale Tamiya kit of the Vought F4U-1
'Birdcage' Corsair.
When the Tamiya Corsair series was released a few years ago, it was
considered that the cockpit detail was more than sufficient and did not
really require any aftermarket detail sets to enhance it. Time moves on
and the standard of detail on kits has vastly improved leaving the
Tamiya Corsair kit behind.
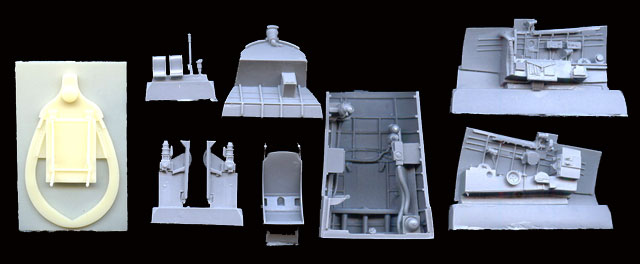
This new kit from Aires has come to the rescue. It provides 12 resin
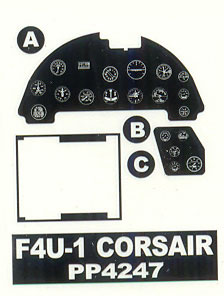
pieces as well as 22 photo-etch ones and three acetate ones to produce a
'sandwich' instrument panel
The resin parts provide you with an entire 'tub' to fit inside the
fuselage. This tub comprises a singular semi-circular piece
incorporating the bottom and sides of the fuselage onto which are placed
separate left and right fuselage interior pieces and front and rear
bulkheads to complete it. The front bulkhead incorporates the instrument
panel shroud and gun sight whilst the rear one incorporates the armour
plate and seat mount. The balance of resin parts include the control
column and stick top, rudder pedals, foot troughs, wobble pump (?)
handle and seat. These parts are all perfectly cast and crammed with
detail. All of the resin parts, less the rear bulkhead (which is cast in
the older, tan coloured resin), have been cast in the new and more user
friendly (not as brittle) mid-grey resin that Aires are now starting to
use.
Click
the thumbnails below to view larger images:
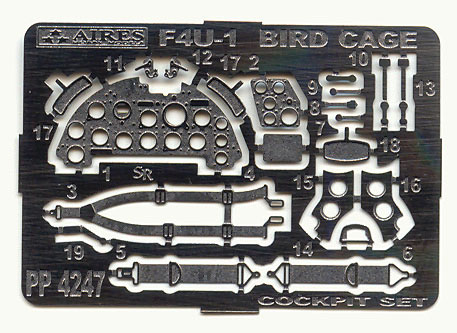
The
photo-etch fret carries the instrument panel as well as the seat harness
and tiny detail parts including separate throttle and mixture handles
that Carpet Monsters just love to devour. Photo-etch parts are also
provided for the canopy including rear view mirrors and locking handles.
The metal used to produce the fret is soft and easy to work with, much
like the lead you get from wine a bottle It is easy to manipulate and
drape the belts and harnesses onto the seat to make them appear more
realistic.
The acetate sheet carries the instrument panels as well as the internal
armour plate glass. Strangely though it does not carry the reflector
glass for the gun sight but I'm sure that there is sufficient acetate
left over to enable you to fabricate one.
Now for the million dollar question when dealing with Aires resin
cockpit and detail parts - does it fit? A cursory dry-fit of the tub
(with its casting plugs removed) including the sidewalls and front and
rear bulkheads taped onto it into the fuselage of one of my un-built
Tamiya F4U kits tells me that minimal grinding, filing, sanding and
swearing is needed to integrate the resin to the kit parts. To be fair
though, Aires does warn you that 'Thinning of the plastic parts and
dry-fitting of the assembly needed!' but it seems that this kit needs
less that some of the others that I have in progress.
Accurate? It looks like the pictures I found on the internet and in the
Detail and Scale book and I have no qualms in using it.
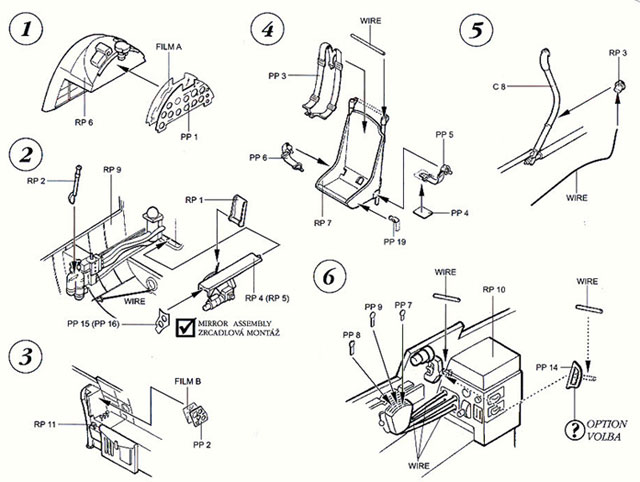
A small instruction sheet is included. It carries 'exploded views' of
the suggested assembly sequence as well as a 'parts map' to assist you
in identifying the tiny photo-etch parts.
As with all Aires kits, there are no painting instructions at all. If
you are going to attempt one of these, arm yourself with the Detail and
Scale F4U Corsair, Volume 55 book. It contains colour pictures of an
F4U-1A cockpit but from what I understand, the 'Birdcage' cockpit was
not all that different.
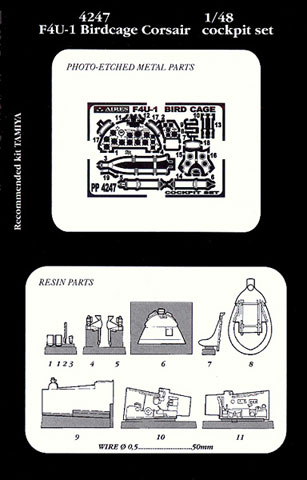
The kit comes packed in the standard small kit packaging used by Aires
and it very well packed indeed! The resin parts sit in a vac formed tray
which in turn sits on top of a thick cardboard header onto which the
photo etch fret and instructions are also placed. A further vac formed
clear plastic cover is then slid over both the tray and the header and
it both traps and displays the resin and photo-etch parts. Staples are
then punched through the header card and the plastic cover to fasten
them together. Great packaging indeed and it will ensure that the kit
arrives in your hand with all the parts intact.
A nice kit from Aires.
Recommended.
Thanks to Aires for the
review sample.
Text and Images Copyright © 2005 by
Rodger Kelly
Page Created 04 July, 2005
Last updated 06 July, 2005
Back to HyperScale
Main Page
Back to Reviews Page
|
 Home |
What's New |
Features |
Gallery |
Reviews |
Reference |
Forum |
Search
Home |
What's New |
Features |
Gallery |
Reviews |
Reference |
Forum |
Search