|
|
S u m m a r
y |
|
Catalogue Number and Description |
Aires Hobby
Models 4270 - F6F Hellcat Cockpit |
| Price: |
available
directly from
http://www.modelchoice.net |
| Scale: |
1/48 |
|
Contents and Media: |
Grey and cream coloured
resin, acetate film, photo etched metal |
| Review
Type: |
FirstLook |
|
Advantages: |
Excellent detail and casting;
|
|
Disadvantages: |
No painting
instructions |
|
Recommendation: |
Recommended
|
Reviewed by
Rodger Kelly

Aires' 1/48
scale F6F Hellcat Cockpit will be available online from
Squadron.com
The 1/48
scale Hasegawa kit of the Grumman F6F Hellcat features in two new
additions to the Aires Hobby Models Masters Series. The two new releases
being 4273, a complete wheel bay set for either the F6F-3 or -5 and this
one, 4270, a mixed-media kit cockpit set for the F6F-3.
The Hasegawa kit was first released in 1995. It was a great kit then and
is still a great kit some 11 years later. It does suffer from
inaccuracies in the cowling and the wheel bays but all-in-all it builds
into a nice replica.
The kit's cockpit is acceptable when built out of the box but given the
size of it; it really is a little sparse. Just about all of the major
aftermarket companies identified this and have produced cockpit sets for
it, including Aires. That set, 4210, was one of their earliest efforts.
It is however their all-new latest effort at the Hellcat that is the
subject of this review.
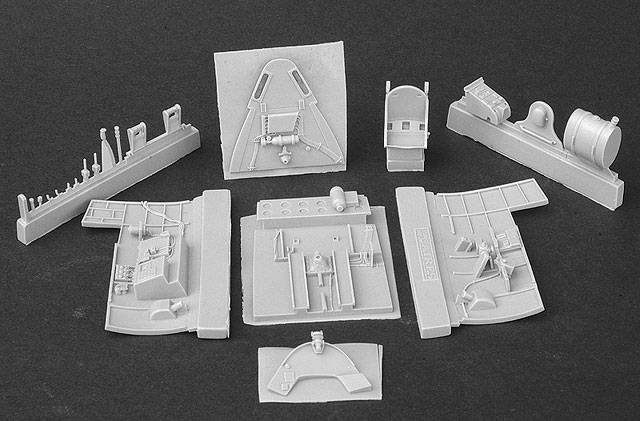
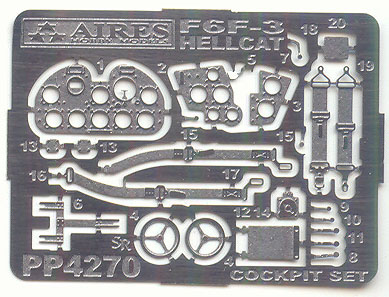
The kit consists of 19 resin parts, 20 etched metal ones and three
acetate instrument panels.
Click
the thumbnails below to view larger images:
The resin
parts provide you with, in the main, left and right cockpit walls, a
floor, seat, rear bulkhead, centre console, amour plate, rudder pedals,
control column, instrument coaming, and hydraulic pump handle.
The photo-etch fret provides the main instrument panel as well as the
two smaller ones to either side, seat belts, elevator trim tab control
wheel, cowl flap control handle, oil cooler shutter handles, tail wheel
control lock, as well as many other tiny pieces. The metal used by Aires
for these parts is soft, malleable and very easy to use.
The resin cockpit walls are cast to include the various consoles,
throttle body, electrical distribution panel, radio controls, IFF
equipment, and canopy locking handle. The floor includes the heel boards
and control column base. The rear bulkhead is also well detailed which
is a pity as much of it will not be visible once the kit is assembled. I
am not sure about the two cut-out panels on this piece. None of the
references that I have or a long search through all the hits I bought up
on Google show these so I'm a bit mystified!
The resin parts are all cast in a light grey flexible resin. The casting
is first rate with crip detail and no bubbles or miscasts at all. Aires
really seem to have worked out how to get the best out of resin and the
detail includes 90◦ undercuts – really brilliant. Whilst the main parts
carried a little flash, it was easily removed by simply snapping it off.
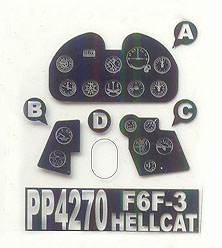
The acetate sheet carries the main instrument panels as well as the two
auxiliary ones to either side. The sheet also carries the gun sight
reflector glass (Film D).
Does it fit? To be truthful I have not yet tried to fit it into a kit
yet as you need to "reduce" the kit parts first as Aires points out in
the small instruction sheet however, the resin parts themselves – the
side walls, the floor and rear bulkhead do dry fit together well. To be
perfectly honest, none of the Aires cockpit sets I have used to date
have not been all that difficult to use just as long as you are aware
that you will need to spend time with various grades of sandpaper
preparing the kit parts.
Accurate? I compared the parts to the cockpit pictures in my battered
and well used Detail and Scale book and they all compare very favorably
– apart from the rear bulkhead and I for one will not have any qualms in
using it for my next Hellcat project.
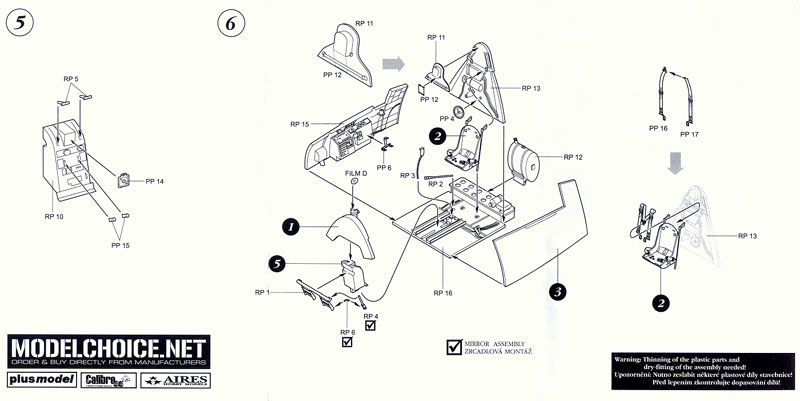
A small instruction sheet is included. It carries 'exploded views' of
the suggested assembly sequence as well as a 'parts map' to assist you
in identifying the tiny photo-etch parts.
No painting instructions are included but a quick "Google" will come to
your rescue here – ain't the internet wonderful!
The kit comes packed in the standard small kit packaging used by Airies.
The resin parts sit in a vac formed tray which in turn sits on top of a
thick cardboard header onto which the photo etch fret and instructions
are also placed. A further vac formed clear plastic cover is then slid
over both the tray and the header and it both traps and displays the
resin and photo-etch parts. Staples are then punched through the header
card and the plastic cover to fasten them together.
This is a nice update from Aires. Just as long as you are prepared to do
some work in preparing the kit parts you will be rewarded with a sunning
replica!
Recommended.
Thanks to Aires for the
review sample.
Text and Images Copyright © 2006 by
Rodger Kelly
Page Created 27 February, 2006
Last updated 27 February, 2006
Back to HyperScale
Main Page
Back to Reviews Page
|
 Home |
What's New |
Features |
Gallery |
Reviews |
Reference |
Forum |
Search
Home |
What's New |
Features |
Gallery |
Reviews |
Reference |
Forum |
Search