|
Bf 109G-10 Type 110
Cowling Conversion, 1/32 scale
Cutting Edge Modelworks
|
S u m m a r
y |
|
Catalogue Number and Description |
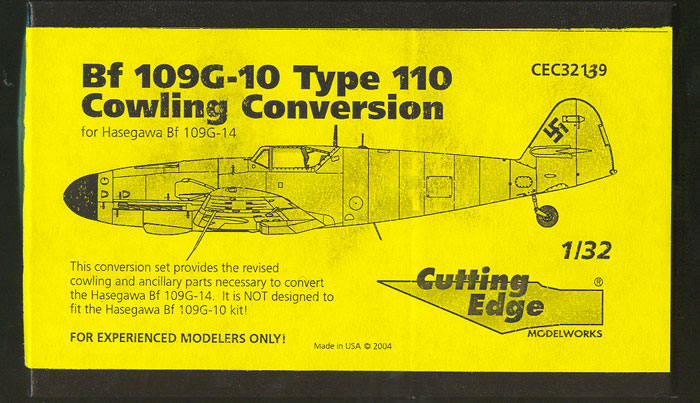
CEC32139 - Bf
109G-10 Type 110 Cowling Conversion |
| Price: |
USD$29.99 from Meteor
Productions website |
| Scale: |
1/32 |
|
Contents and Media: |
16 parts in
grey resin |
| Review
Type: |
FirstLook and
FirstBuild |
|
Advantages: |
Good shape
capturing the characteristics of this unique sub-variant; excellent
casting; clever engineering; very good fit; relatively simple
preparation with only two cuts per fuselage side required; utilises
Hasegawa G-14 kit with better spine and canopy cross-section shapes
(compared to G-10 kit). |
|
Disadvantages: |
Some extras
will be required |
|
Recommendation: |
Highly Recommended
to experienced, large-scale Luftwaffe modellers |
Reviewed by
Brett Green

HyperScale is proudly sponsored by Meteor
Productions
Until fairly recently it was commonly thought that there was a
variant of the Bf 109G-10 with the DB605AS engine.
This was a fair assumption based on examination of wartime photos. A
number of very late-war Bf 109G-10s were observed with the streamlined
"asymmetrical" cowl but without the characteristic lower chin bulges.
These aircraft also shared another characteristic - the crescent-shaped
fairing on the fuselage side below the port side of the canopy was
substituted with a simple, flat rectangular panel.
Recent research uncovered the true story. These aircraft were powered
by the DB605D engine like the rest of the Bf 109G-10 family. However,
they were the subject of an attempt at the Messerschmitt Erla production
facility to further streamline the front end of the bulging fighter.
The oil cooler was made wider and shallower, and the plumbing was
redesigned. This led to a new wider and shallower oil cooler housing,
and permitted the lines of the lower forward cowl to be smoothed,
eliminating the cheek bulges. The main cowl contours were modified too,
as were various panels. This, in turn, led to different shapes for the
gun troughs. A new, larger supercharger intake was installed. The
squared-off port-side fairing was another key identifying factor.
Luftwaffe researcher Jean-Claude Mermet has labelled this the "Type
110 cowl". This is not a Luftwaffe designation, but is a convenient way
to name the cowl in the absence of an official designation.
The vast majority, if not all, of the Bf 109G-10s with the Type 110
cowl had the tall tail, but they were equipped with every possible
combination of short/tall tailwheel strut and narrow/wide wheels and
upper wing bulges.
Cutting Edge has now released a Bf 109G-10 Type 110 Cowling
Conversion in 1/32 scale for Hasegawa's Bf 109G-14 kit.
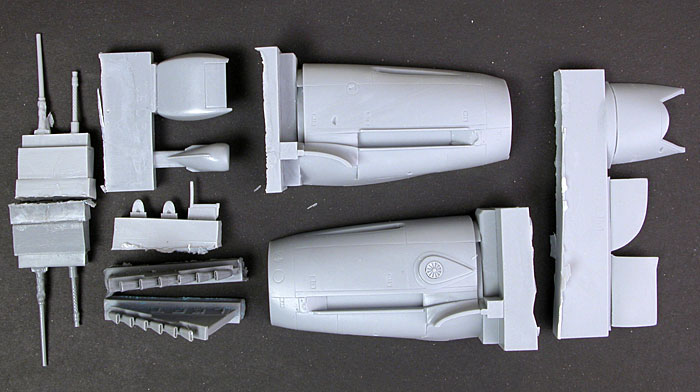
The set comprises 16 parts in Cutting Edge's customary grey resin.
The conversion includes new cowl halves for a hollow nose, top rear
"saddle", wide oil cooler housing, larger supercharger intake, both
fuselage fairings, scoops, machine gun barrels, exhausts and even a
starter crank.
The parts are perfectly cast and nicely detailed. All the obvious
major attributes are covered, including the re-shaped cowl and some more
subtle elements. One example is the redesigned gun troughs, which are
quite obviously asymmetrical due to the different shapes of each cowl
half. The contours of the new nose look good compared to photos and to
Mermet's drawings.
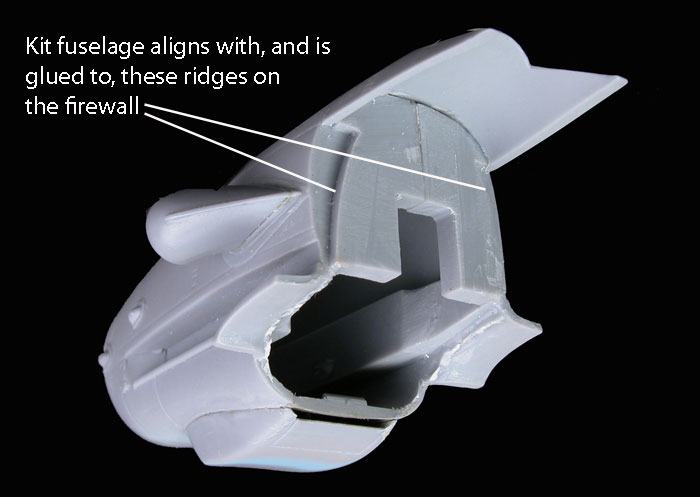
The cowl halves incorporate the firewall at the back of the parts. In
a clever piece of engineering, this firewall will ensure the correct
angle of attachment for the plastic fuselage halves, and for the top
saddle.
The new big supercharger intake is cast in one piece, and the
port-side cowl has turbine detail in place. The wide oil cooler has
locating pins - don't shave them off when cleaning up the part!
The instructions are good, including construction photos and detailed
text. You really should thoroughly familiarise yourself with the
instructions before you start cutting and gluing.
But why is this set designed for the G-14 kit and not the G-10?
Well, the G-10 kit has the crescent-shaped fairing moulded to the
fuselage. It would take a fair amount of work and a delicate touch to
remove the bulge and not damage the fuselage part.
In addition, Hasegawa represented the basic fuselage and cross
sections very nicely in the G-14 kit, but when they produced the G-10
they introduced an annoying error. The rear fuselage spine Hasegawa's
1/32 scale Bf 109G-10 kit has been flattened off. This is quite
noticeable and not at all accurate. Because this area coincides with the
Erla canopy, this part is also the wrong cross section.
The downside is that the G-14 kit comes with the earlier propeller
blades, and only with the small wheel bulges/narrow wheels and the short
tail wheel strut. The "Type 110" Bf 109G-10s could be fitted with big or
small wheels; and either long or short tailwheel struts, so depending on
the aircraft you are depicting the wheels and bulges might not be an
issue. If they are an issue, Cutting Edge already offers a long
tailwheel set with white metal strut. MDC has a very nice long tailwheel
set too, plus the G-10 wide wheels in 1/32 scale. It is only a matter of
time until we get a wide bulge in resin from someone!
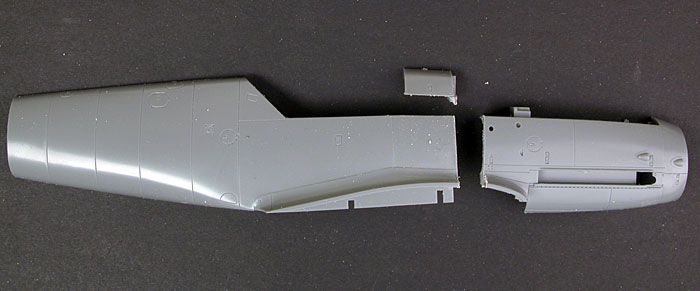
The first task is to remove the parts from their casting blocks.
When you are removing the big cowl halves, make sure you cut as close
as possible to the casting block in order to retain the firewall area.
This is an important alignment aid for the kit fuselage halves and the
resin top rear cowl. The opening for the oil cooler mount is flashed
over. I scored around the outline with a scriber then cut most of this
resin away with side cutters before tidying up with a sanding stick and
hobby knife. Preparing each cowl half took around ten minutes. The
openings for the cowl guns is also flashed over. This was opened with
side cutters and cleaned up with a sharp hobby blade.
I recommend that the resin "sprue" that holds the top rear cowl and
the two fairings is cut in two before the parts are separated. I cut
this sprue with a razor saw between the cowl and the fairing. The
fairing parts are very thin and delicate. Overzealous sawing of the cowl
might damage the fairing if they are both attached to the sprue at the
time.
Some of the blocks look quite imposing but most of the parts are
quickly removed. I took my time, used the right tools (razor saw for
straight cuts, hobby knife for cleaning up, sanding stick for finishing
off), cut close to the blocks and got a good result without too much
fuss.
Assembly Sequence
I almost followed the instructions. After all the parts were
prepared, this is the assembly sequence that I decided on:
-
The kit parts were prepared. First I
cut off the nose along the vertical cowl panel line with a razor
saw. I left around 0.5mm extra material in place in case I will need
it during final assembly. Next, the top "saddle" part was removed.
-
The resin cowl halves were test
fitted and glued. Test fitting showed that these big resin parts
were quite flexible, so first I superglued the rear firewall section
and the top-rear join. When this had dried, I aligned the join at
the top of the cowl and ran a bead of surperglue along the join line
on the inside of the cowl. Don't do this on the outside or
you'll have a horrible mess to clean up! When the top join was set,
I held the bottom cowl join and repeated the gluing step. The fit
was excellent. A light once-over with a sanding stick eliminated any
tiny ridges. At some stage I will add a hinge line to the top of the
cowl - probably a very thin piece of stretched sprue
-
I installed kit part A22, the
horseshoe tank face, into the front of the cowl. I originally
thought I might glue tabs inside the cowl halves to establish a firm
join, but the fit was so good I did not need to. I pushed the
plastic part into place, fiddled a bit to make sure everything was
straight, then ran a bead of superglue around the part from the
inside of the cowl. With the hole for the oil cooler still open,
there is plenty of room to manoeuvre with a small tube of super
glue.
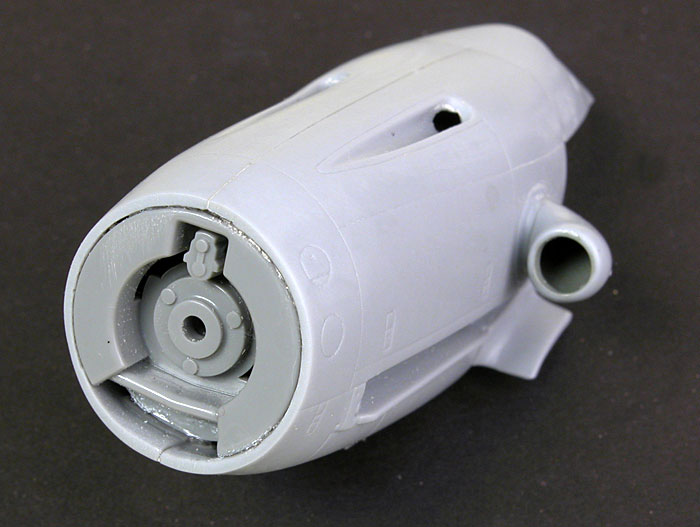
-
Next, I installed kit part G5, the
oil cooler mounting plate. Test fitting showed that the part would
stick out 1-2mm at the rear, so I used a sanding stick and hobby
knife to make the opening slightly longer at the front. I ran a bead
of super glue around the edges of the kit part then pushed it into
place for a gap-free fit.
-
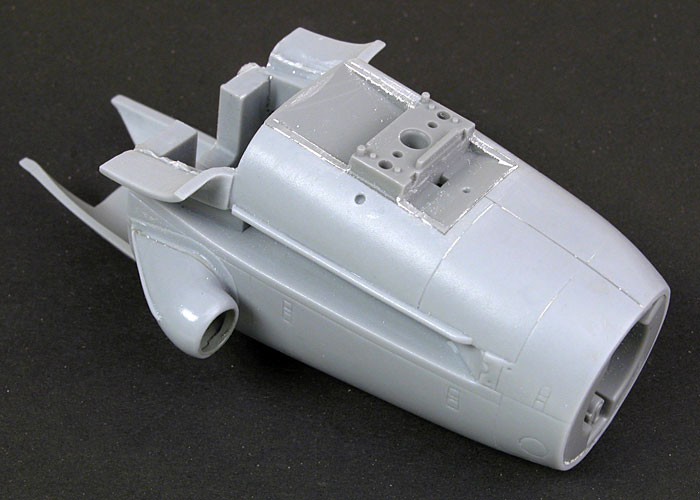
I glued the saddle-shaped top rear
cowl part to the back of the nose assembly. I figured this would
ensure perfect alignment at the top rear cowl join line, and will
also provide an additional point of reference when the resin nose is
glued to the plastic kit fuselage.
-
After this, you can paint the kit oil
cooler faces (parts M5 and M6) and glue them in place; add the
supercharger intake, the oil cooler housing and intake scoops. There
are only two scoops supplied but you'll need four. Just slice two
off the discarded kit nose.
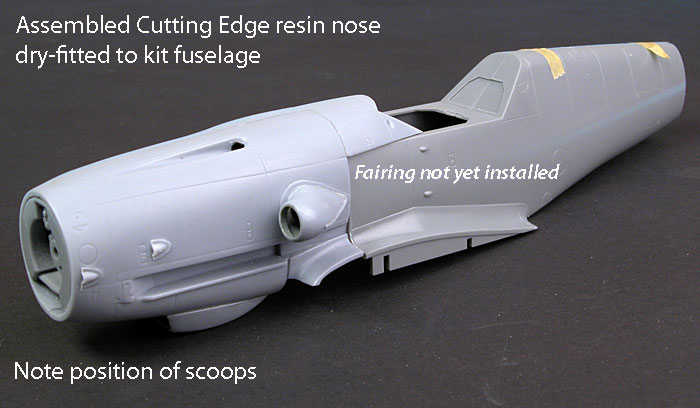
That is as far as I have gotten, but on
my return from the USA I will be building the remainder of the kit and
mating the resin nose to the plastic. Once the nose and the fuselage are
together, then I will add the fairings.
The Messerschmitt Bf 109 is without doubt my favourite aircraft and
the Type 110 cowl variant has been one of my most-wanted conversions in
either 1/48 or 1/32 scale.
To my eye, this version is the ultimate expression of grace and grunt
in the Bf 109. The elimination of the chin bulges and the streamlining
of the nose returned the smooth lines lost since the Bf 109G-4, yet the
muscular bulk of the DB605D is also obvious. I am therefore delighted to
see Cutting Edge's 1/32 scale Bf 109G-10 Type 110 Cowl Conversion.
I am impressed with the unique shapes, the clever engineering and the
excellent fit of Cutting Edge's resin parts.
I am also quite pleased with the decision to base the conversion of
Hasegawa's 1/32 scale Bf 109G-14 kit, even though some work to the prop
blades will be required and, depending on which aircraft you are
building, new wheels/bulges might also be necessary.
The Cutting Edge 1/32 scale Bf 109G-10 Type 110 Cowl Conversion will
be within the abilities of most modellers with resin experience, and
will result in a very different look for your Hasegawa Bf 109G.
Highly Recommended.
Thanks to Meteor Productions for the review samples.
Cutting Edge Modelworks products are available from
Meteor Productions Website
Text and Images Copyright © 2004 by
Brett Green
Page Created 30 July, 2004
Last updated 30 July, 2004
Back to HyperScale
Main Page
Back to Reviews Page
|
 Home |
What's New |
Features |
Gallery |
Reviews |
Reference |
Forum |
Search
Home |
What's New |
Features |
Gallery |
Reviews |
Reference |
Forum |
Search