|
This is another of the
update sets for the Testors / Italeri U-2R/S / TR-1 "Dragon
Lady" released by Cutting Edge back in 1998. On the surface, it
seems to be one of the simplest updates on the market as it is one
piece and requires no slag removal -- just replace the kit nose
outright with the resin piece. Not quite so fast...
I picked up one of these noses when it was first released in 1998.
I liked the more purposeful look this nose gives to the U-2R, being
longer and fatter-looking than the standard U-2R nose.

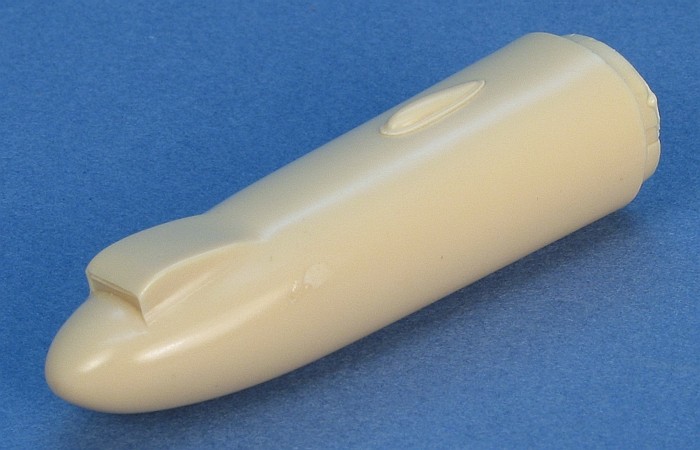
The Full Update Set -- All One Piece of It! |
The shape and size of this one piece update set looks really good.
The copies I obtained are very smooth and blemish free. There are no
panel lines molded into the nose. As the instructions read, the real
nose has no discernable lines. The dielectric panels on the sides of
the nose are slightly off color, but seem to not have any panel line.
The instructions do provide a full size 1/48th
scale template for painting the dielectric panels on the nose sides.
The intent of this set is to provide a drop-in, no fuss replacement
of the kit nose. The reality is that there is a bit more work to it
than that. It is true that no slag needs to be removed from the piece.
The slag actually works as a locator to help hold the nose on the
model. The problem is that resin shrinks just slightly when it cures.
The master for the nose was obviously made as an exact fit for the kit
fuselage. Accounting for shrinkage, the original nose I bought in 1996
is about a sixteenth of an inch too small in diameter to match the
nose of the kit -- OUCH!
There is hope, though.
The original nose I bought in 1998 was molded in the old tan resin
that most after-market companies used at that time. I recently noticed
the ASARS nose on the Cutting Edge display tables at a model
meet. The nose is now molded in the new gray resin that most all
Cutting Edge sets use. I remembered that the gray resin does not
seem to shrink as much as the tan resin. So, I picked up a new nose
and was relieved to find the nose was much closer to the correct
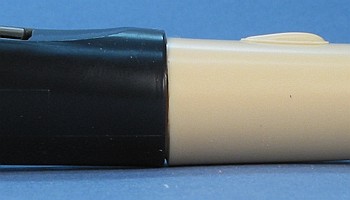
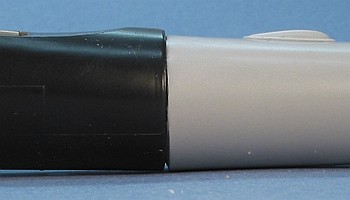
diameter. See the pictures below.

Old (Tan) Mold ASARS Nose |

New (Gray) Mold ASARS Nose |
The difference is not a lot, but every little bit helps. The new
gray nose is only about half as much shrunk as the older tan nose.
There are two ways to fix the fit:
- Add filler to the outside of the nose to build it up to the
diameter of the kit fuselage. This will involve a good bit of
careful sanding and shaping to get the contours to line up without
overly effecting the shape of the nose.
- Cut relief slits in the kit fuselage to allow it to be reduced
in diameter to match the nose. This is a much easier to control
process (in my mind).
The decission on which way to work the nose is up to each modeler.
I tend to like the second way and will use that approach on my U-2S
"Dragon Lady" model.
There you have it -- a simple one-piece update that is not quite so
simple to use. All the same, it is the only show in town for doing an
ASARS equiped U-2R/S / TR-1. If you have a gray resin nose, the size
difference is much less than with the tan resin. I would consider
replacing your nose if you have a tan resin one.
I can recommend the current gray resin version of this set. I would
not recommend the older tan resin version. |
Home |
What's New |
Features |
Gallery |
Reviews |
Reference |
Forum |
Search