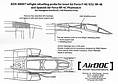
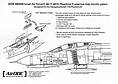
|
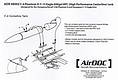
F-4
Phantom II Accessories
10 separate sets
AirDOC
Reviewed by David W. Aungst

HyperScale is proudly supported by
Squadron.com
| Back a couple months,
Paul from Victory Models posted a quick note on the
HyperScale forum about new AirDOC resin sets
coming out for the F-4 Phantom II. The sets would be
mastered by Willy Peeters, and the resin would be cast
by Aires. After my heart dropped back down out of
my throat, I started the long wait for these sets to be
completed and reach the shores of the US.
With Willy Peeters' and Aires' reputations, I
was sure the sets would be fantastic.
The sets arrived at my door on the Saturday after
Thanksgiving. With the whole day off and nothing to do
but marvel at my new toys, I decided my time would be
best spent writing up some reviews of the sets to share
with the rest of the world.
My excitement was quickly tempered by the fact that
several of the sets have issues. I will highlight these
as I describe each set.
The set prices quoted here are the prices I paid for
the sets from Victory Models. Other sites may have
varying prices. There seemed to be a hap-hazard approach
to the prices. Some sets with lots of pieces were less
expensive per piece than other sets with only a few
pieces. I am unsure what AirDOC's reasoning is on
this.
|
ARN-101 Update Set
(48001, $15.00)
| |
Set Pieces
|
|
| |
Instructions
|
|
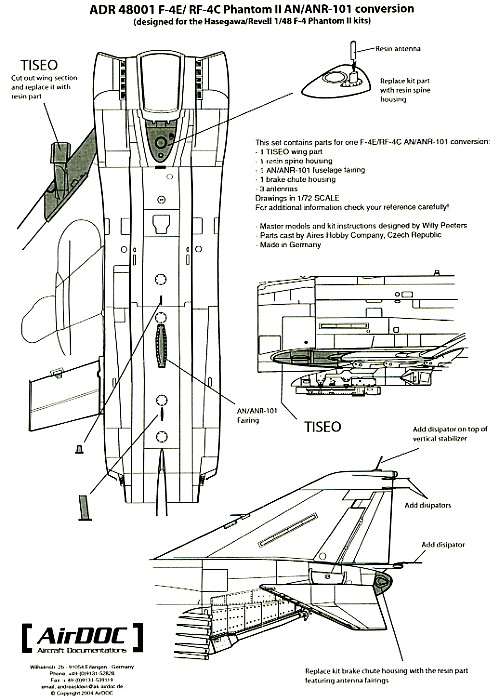
This is a straight-forward
set. It applies to late-model F-4Es and RF-4Cs
in US service. As far as I know, ARN-101 equiped
aircraft have never been sold abroad.
ARN-101 is a digital fire
control computer refit that replaced the older
analog systems originally installed in the F-4.
For the F-4E, the system was fit to all
surviving US aircraft starting from serial
number 71-0224. This is also the first aircraft
to get the Target Identification System
Electro-Optic (TISEO) applied to it from the
factory.
For the RF-4C, the system was fit to most all
the surviving US aircraft in the later
production blocks. There was not any real
pattern to which aircraft got the upgrade, so
watch your reference when deciding if you wish
to use the upgrade on any given RF-4C model.
The easiest defining attribute to the ARN-101
fit is the diamond-shaped, aerodynamically clean
LORAN antenna on the aircraft spine. This
antenna is located about halfway between the
back of the rear cockpit and the front of the
vertical tail. To go with the LORAN antenna are
a number of smaller dimple and blade antennae.
Rounding out the fit are a slew of static
discharge whiskers located on the wings and
tail.
The set provides many of the needed updates
to accomplish the ARN-101 upgrade on the
airframe.
- the LORAN antenna for the spine
- a new para-brake door with refined
dimple antennae
- assorted blade antennae
- a new turtle-deck for behind the rear
cockpit with associated antennae
- a replacement left wing root leading
edge with a TISEO camera fit (this is for
F-4E updates, only)
- NOT provided are any of the
static discharge whiskers
The "Up" Side
- Shapes, sizes, and contours on all the
pieces look really good.
- The TISEO camera detail inside the wing
fairing is exceptional.
The "Down"
Side
- There is some tricky cutting of the kit
required to use the TISEO piece. It follows
panel lines of the kit, but the lines are
not all straight and easy. Getting a perfect
fit with only panel line edges (and no
filler) will be most difficult.
- The instructions are incomplete at
pointing out all the locations of the static
discharge whiskers. They show the ones on
the vertial tail surfaces, but they ignore
the ones on the horizontal tails and wings.
- The modeler needs to figure out how to
cover the TISEO camera fairing with a clear
window.
- This is subjective, but the relative
worth of the set is diminished by the fact
that these pieces are mostly all available
now through the various Hasegawa
Phantom releases. The RF-4 kits provide the
LORAN antenna and all the F-4E kits provide
the TISEO. The turtle-deck with its
associated antennae come in all the USAF
releases (F-4C/D/E/F/G). Some thin styrene
sheet could make all the blade antennae for
a mere fraction of the cost.
Recommended
-- If you do not have access to various
Hasegawa kits which already provide these
details, this set will be helpful. I will not be
buying another of this set for myself.
|
| |
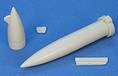
600gal F-4/F-15 Fuel
Tank (48002, $19.00)
| |
Set Pieces
|
|
| |
Instructions
|
|
I do not know the exact date,
but somewhere in the late 1970s or early 1980s
all the USAF Phantom fleet was upgraded to carry
the F-15-style centerline fuel tank in place of
the original Phantom-style 600gal centerline
tank. My understanding was that the newer tank
could carry more G-loading than the old tanks.
Oddly, the US Navy never made the same upgrade
to their Phantom fleet. Other Phantom users that
did make this upgrade were the Germans on their
F-4F and RF-4E aircraft and Japanese on the
F-4EJ(kai) and RF-4EJ(kai).
The set provides the
following pieces.
- one F-15-style fuel tank (split into two
pieces)
- the two bellow hard-points where the
tank attaches to the Phantom centerline
- minor detail pieces for the pivot-point
on the back end of the tank
- attachment details (instructions show
them, my set did not have them)
The "Up" Side
- Many Hasegawa Phantom releases do
not include this tank in the box. With this
set, now you can add this detail to any
Phantom kit.
The "Down"
Side
- The inverse of the good point, many
Hasegawa releases do have this detail in
the box. Modelers need to buy and
investigate the kits before just
unconditionally buying this set.
- The two-part tank can be cumbersome to
assemble. I have had other sets do this
two-part style and it can be exceedingly
hard to get just the right amount of slag
removed from the pieces so that the two mate
without producing a distorted tank. The fact
that both pieces must be oriented exactly to
each other will further compound the issue.
- There are sway bracing struts on the
real tanks that are not captured in the set
or mentioned in the instructions.
Recommended
-- I will definitely be buying more of this one.
|
| |
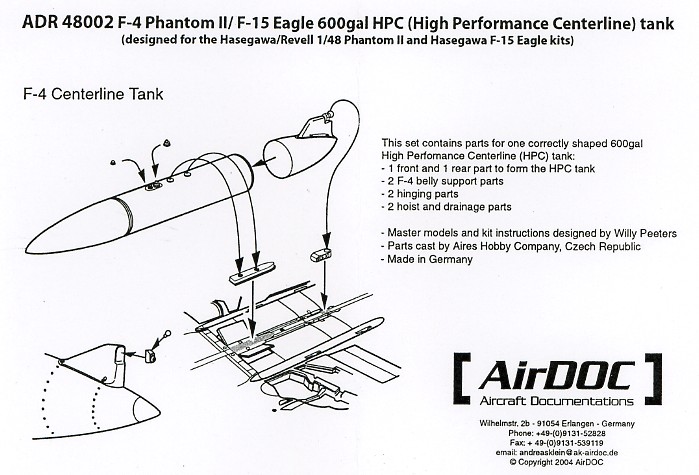
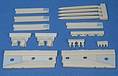
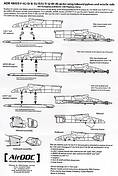
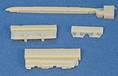
Underwing Inboard
Weapons Pylons (48003, $19.00)
| |
Set Pieces
|
|
| |
Instructions
|
|
At last!!! I no longer
have to keep watch on E-Bay for the old KMC
Phantom pylon sets that always seem to go for
such big dollars. Where KMC provided all
the weapons pylons for all the hard-points, this
set only provides for stations 2 and 8 (where
the Sidewinder missiles are found), but that is
OK as this is the most used of all the pylons.
The set provides the
following pieces.
- station 2 and 8 pylons
- separate add-on flare and chaff
dispensors for the rear ends of the pylons
- alternate Sidewinder missile rails
(Aero-3B and LAU-7)
- alternate Sidewinder missile rail
mounting points
- sway braces for the lower pylon where
the ordnance attaches
The "Up" Side
- I have waited too long for these to be
available. I hope to see US Navy style
pylons in the future.
- The flare and chaff dispensors are
correctly detailed with the dispensors
installed. Every other set before (including
KMC) has not gotten these dispensors
correct.
- Alternate missile rails and mounting
point so that the set will work for most any
Phantom user. The instructions indicate
which combinations go to what users.
The "Down"
Side
Believe it or not, there is a down side to
this set.
- The pylons do not have the large sway
braces at the top of the pylons where they
attach to the wing. All Hasegawa kits
have these braces inappropriately molded to
the lower side of the wing. They should be
part of the pylons, not the wing, with about
three quarters of an inch gap between them
and the wing.
- On a pickier point, the pylons are
identical, not handed for left and right.
There are minor variations in the scribing
and details that technically require a left
side and right side, but what is present in
the set will work.
- I am hoping it is just my set, but my
sample came with two left side flare and
chaff dispensor pieces and no right side
ones. Anyone know how to get replacement
parts from AirDOC?
Highly
Recommended -- Even without the
upper sway braces, I will be buying tons more of
these. |
| |
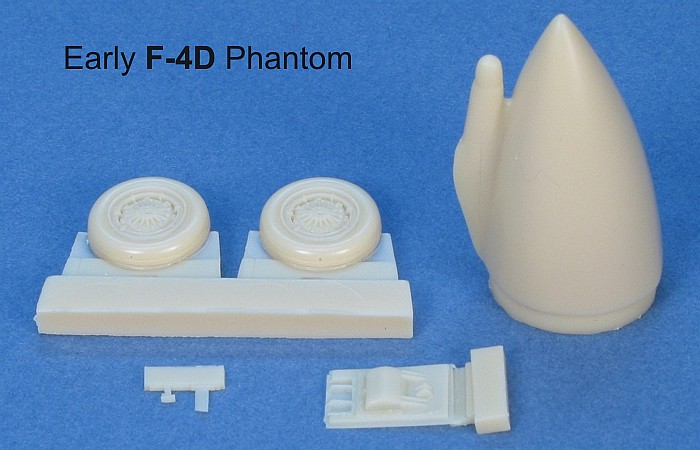
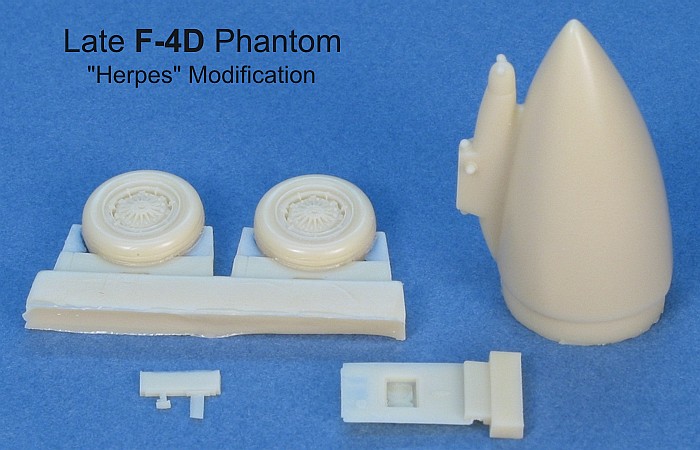
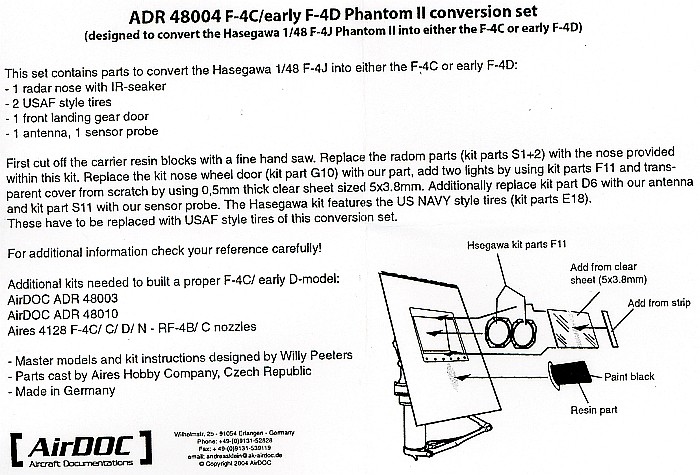
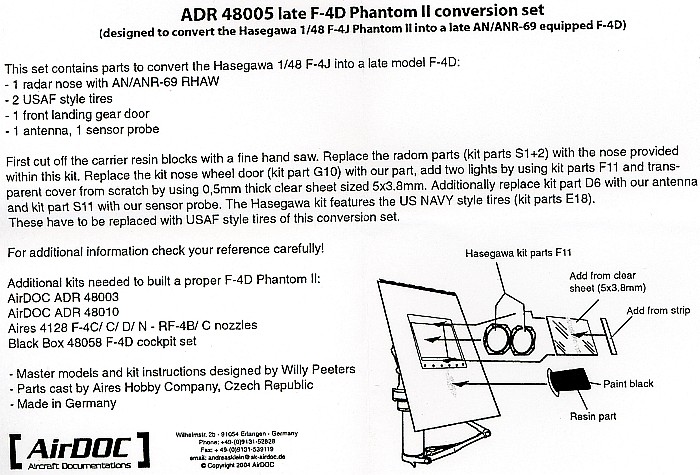
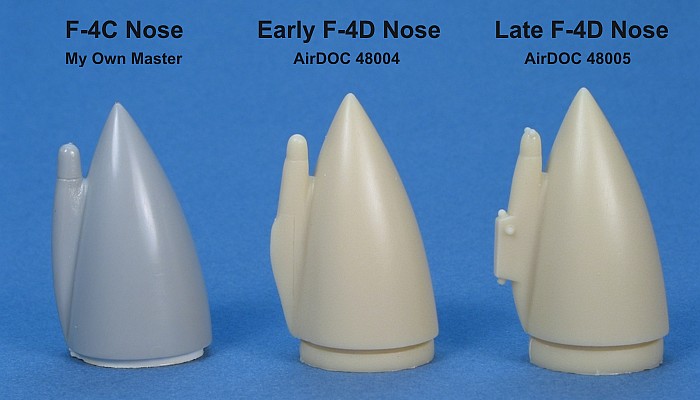
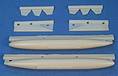
F-4C and F-4D
Conversions (48004 & 48005, $22.00 each)
| |
Set Pieces
|
|
Set Pieces
|
|
| |
Instructions
|
|
Instructions
|
|
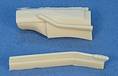
These were my biggest
disappointments in the whole bunch. Finally
someone has recognized that the F-4J can easily
be converted to an F-4C/D with only some minor
modifications. These two sets are AirDOCS's
attempt at providing these converions.
The first big note to make
is that these sets on their own are not enough.
Both sets provide only the following pieces.
- a replacement nose cone with varied IR
sensor fairings (I know, only early F-4Cs
had IR sensors, but the fairing remained
even when the IR sensor was removed).
- a replacement forward nose wheel well
door with appropriate Air Force details
- replace main wheels with Air Force style
hubs
- a couple minor antennae for on the
replacement nose wheel well door
The instructions state (correctly) that to do
a full conversion, you will also need new
horizontal tails, new engine exhausts, and new
weapons pylons at stations 2 and 8. The
instructions fail to mention you will also need
a new cockpit.
The good news is that these other items are
readily available from various manufactures,
including AirDOC. AirDOC 48003 and
48010 (reviewed elsewhere in this posting)
provide the tails and weapons pylons. Aires
and Eagle Designs provide very nicely
molded engine exhausts. KMC is the only
company to date that I am aware of to have made
the F-4C cockpit. Black Box is the only
company to date that I am aware of to have made
the F-4D cockpit.
The "Up" Side
The "Down"
Side
| |
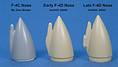
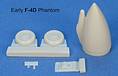
Figure 1
|
|
- The sets actually do
not provide an F-4C nose! The set that
claims to be for an F-4C really has an early
F-4D nose. The difference is in the extra
bulge at the back of the IR sensor fairing.
This area is smooth on the F-4C and lacks
the extra bulge seen on this piece. See the
Figure 1. I could sort-of excuse this
if the instructions mentioned sanding down
the nose to get the correct shape, but they
do not.
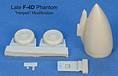
| |
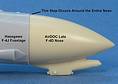
Figure 1
|
|
- Both sets have noses
that are greatly undersized to fit the
Hasegawa F-4J kit. See Figure 2.
I thought that this might be related to
resin shrinkage, but I have created and cast
my own F-4C nose using Alumilite (which is
renowned for shrinkage), and my castings are
not as undersized as the ones from AirDOC.
This is going to be real hard to fix without
obliterating the details around the sides of
the nose. An option could be to laminate
styrene around the resin nose to increase
its cross section, but that will then
require a lengthy recontouring process to
blend the stripping into the rest of the
nose.
NOT Recommended
-- I hate giving this rating, but I have to call
it the way I see it. I can make my own sets
easier than fixing these sets. |
| |
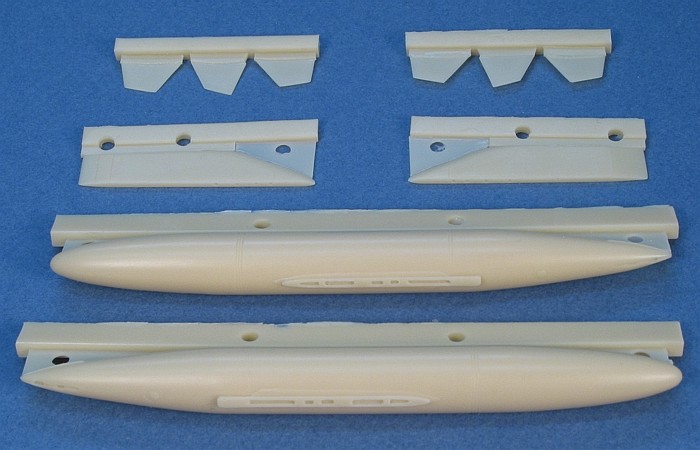
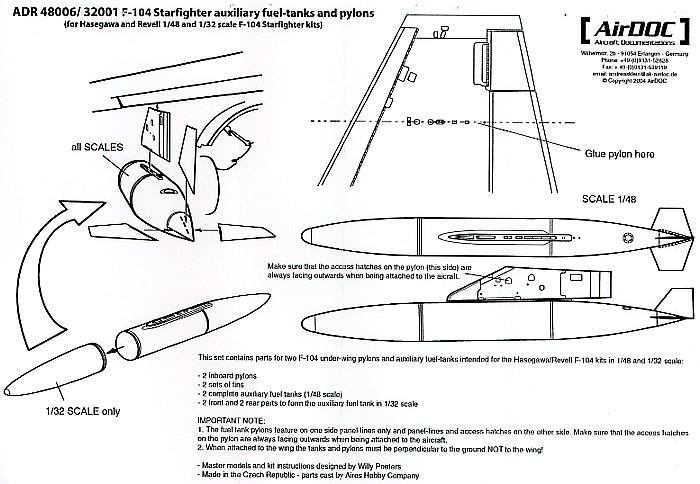
F-104 Underwing Fuel
Tanks and Pylons (48006, $23.00)
| |
Set Pieces
|
|
| |
Instructions
|
|
These are very nice and
sorely needed as Hasegawa has never
produced these details in any of their
Starfighter releases.
The set provides the
following pieces.
- two underwing fuel tanks
- two underwing fuel tank pylons
- two sets of fins to attach to the rear
ends of the fuel tanks
The "Up" Side
- Good castings.
- One-piece tanks assure true-ness of the
tank, as averse to a two-piece style. This
seems to only be true of the 1/48th
scale set. The instructions mention that the
1/32nd
scale set has two-piece tanks.
The "Down"
Side
- I am not an expert, but I read a report
from someone that the way the casting block
is attached to the bottom of the tank
eliminates the possiblity to detail this
area (pipe endings and check valves). These
seem easy enough to add, though.
Recommended
|
| |
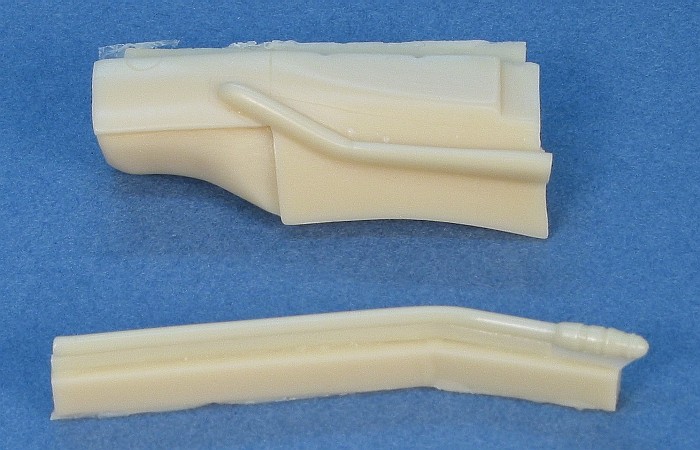
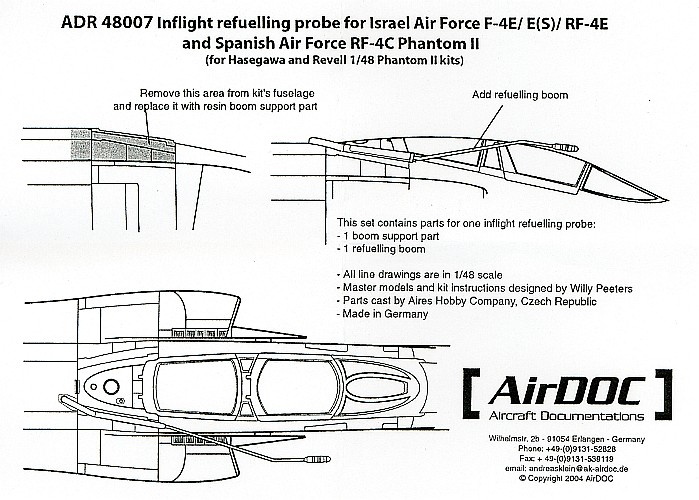
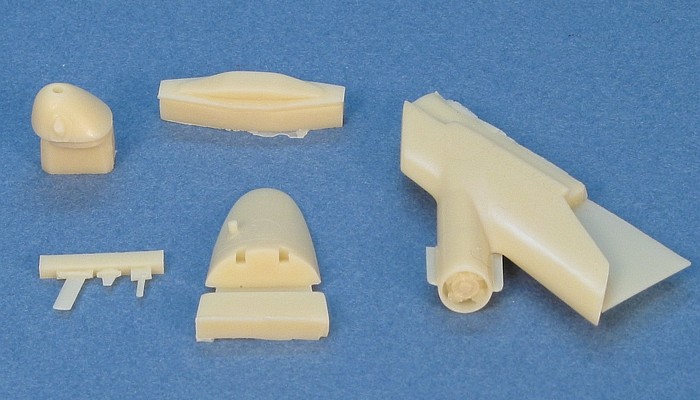
External "Probe and
Drogue" Aerial Refueling Probe (48007, $10.00)
| |
Set Pieces
|
|
| |
Instructions
|
|
Various foreign Air Forces
use the "probe and drogue" style of aerial
refueling, like the US Navy does. Being equiped
with Air Force style Phantoms that come with the
high-speed boom recepticle on the spine is not
helpful to these Air Forces. They have taken the
approach of refitting their Phantoms with a
fixed (non-folding) probe on the right side of
the aircraft. This set provides pieces to
replicate this detail.
The set provides the
following pieces.
- a replacement fuselage section with
external refueling pipe
- a length of separate pipe tipped with
the refueling probe
The "Up" Side
- The style of providing these pieces
duplicates nicely the details of the real
items.
The "Down"
Side
- There is some tricky cutting of the kit
required to use the pieces. The cuts follow
panel lines of the kit, but the lines are
not all straight and easy. Getting a perfect
fit with only panel line edges (and no
filler) will be most difficult.
Recommended
-- I like the detailing of these pieces and
would not mind picking up another couple sets.
|
| |
| IAF Sparrow
Bay Sidewinder Adapter (48008, $15.00)
| |
Set Pieces
|
|
| |
Instructions
|
|
Leave it to the Israelis to
come up with a workable solution to limited
hard-points. When carrying larger ordnance on
stations 2 and 8, those pylons can no longer
carry Sidewinder (or Python) missiles. In order
to provide some self defence capability, the
Israelis created an adapter to fit into a
forward Sparrow missile well that allows for the
carriage of a Sidewinder (or Python) missile.
This set provides pieces to replicate this
detail.
The set provides the
following pieces.
- a LAU-7 missile rail
- a Sparrow missile well adapter and pylon
- assorted sway braces
The "Up" Side
- Good details
- Easy construction and installation.
The "Down"
Side
Recommended
|
| |
Un-Slotted Horizontal
Tails (48010, $15.00)
| |
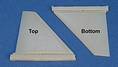
Set Pieces
|
|
After the F-4C/D conversions,
this was my second biggest disappointment. Not
that these tails are really all that bad, but
they definitely missed the mark for me. Let me
explain.
I will first start with a
Phantom anatomy lesson. Slotted and un-slotted
horizontal tails differ in size by only the size
of the slots. That is, take an un-slotted tail
and bolt an inverted slat onto its leading edge
and you have a slotted tail. I confirmed this
point by physically measuring two Phantoms (an
RF-4C and F-4G) at the Air Force Museum a few
years ago.
Across all the Hasegawa Phantom
releases, there are two differnt sizes of
horizontal tails. The earlier releases with
raised scribing (slotted or un-slotted) have an
undersized tail that is a bit smaller than it
should be. The length of the trailing edge of
the horizontal tail on a real Phantom is 99
inches. The raised scribing Phantom kits scale
out to 96.5 inches. The difference in scale is
about 1/16th of
an inch. This may not sound like much, but it is
noticable.
When Hasegawa retooled and engraved
various portions of the Phantom kits, they
changed the tail size so that it was closer to
correct at 98 inches. Unfortunately, they never
engraved the un-slotted tails, so any kits (even
new releases) of versions that need un-slotted
tails get the slightly undersized, raised
scribing tails.
Now, enter the after-market companies to try
to fix the problem. KMC was first with a
"fix". They took the already undersized,
un-slotted, raised scribing tails and engraved
them. Following the anatomy lesson above, they
would have been better to start with an
engraved, slotted tail and just cut off the
slotts, sanding the leading edge back to an
airfoil. This second approach is what AirDOC
has done.
The problem is that AirDOC did not
just stop there. They also removed the arrowhead
shaped reinforcing plate from the top, middles
of the tails. They are very few Air Force style
Phantoms that lack this reinforcing plate. Thus,
the usefulness of this update set is limited to
only aircraft that do not have the reinforcing
plate on them. These exist, but they are in the
vast minority of airframes.
The best use of these tails is on early F-4B
and F-4J airframes, before they were
retro-fitted with slotted tails. Most all F-4C/D
tails had the arrowhead reinforcing plate
applied from the very beginning. Thus, these
tails really are not F-4C/D tails. I can only
hope that AirDOC releases another set
with the arrowhead plates. If they do, I hope
also that they realize that the arrowheads were
on the bottom of the tail as often as not and
provide tails with arrowheads on both sides.
Until then...
The set provides the following pieces.
The "Up" Side
- The tails are closer to the correct size
than the old KMC pieces.
The "Down"
Side
- Having no arrowhead reinforcing plates
limits their usefulness.
- No instructions. Anyone that can not
figure this set out should not be modeling
in the first place, but having an
instruction sheet could outline some of the
limitations of the pieces as I have stated
in this posting.
Recommended
-- If you have need of tails without the
reinforcing plates, go for it. For my own uses,
I will not buy many more copies of this set and
instead will keep cutting off slots from
engraved, slotted tails. I will also continue to
hope for AirDOC to release a followup
set.
|
There you have it. My detail set order was a mixed
bag after I got the time to really study the AirDOC
sets. Mostly my issues are picky trivia, but the F-4C/D
conversions were a real letdown. I hope AirDOC
can rework some things and come up with followup
releases that are better worked out.
|
|
Review Text and Images Copyright © 2004 by
David W. Aungst
Page Created 30 November, 2004
Last updated 30 November, 2004
Back to HyperScale Main Page
Back to Reviews Page
|
 Home |
What's New |
Features |
Gallery |
Reviews |
Reference |
Forum |
Search
Home |
What's New |
Features |
Gallery |
Reviews |
Reference |
Forum |
Search