|
AV-8B Harrier Miniature
Detonation Cord (MDC)
Orion Models, 1/48 scale
S
u m m a r y
|
| Catalogue Number,
Description, Scale and Price: |
OMV-48003 AV-8B Harrier canopy
miniature detonation cord (MDC); 1/48 scale only, for Hasegawa or Revell-Monogram
kits. Price: $5.00 US per set
available online through
OrionModels@aol.com |
| Contents and Media: |
See text below |
| Review Type: |
FirstLook |
| Advantages: |
Helpful accessory for an authentic
touch. |
| Disadvantages: |
|
| Recommendation: |
Highly
Recommended |

HyperScale is proudly supported by Squadron.com
Reviewed by
Ryan Fernandez
Eject! Eject! Eject! Boom!
On some of today’s advanced combat aircraft designs, jettisoning the
canopy even with pyrotechnics prior to ejection is inadequate due to the
lack of airflow around the cockpit to aid in canopy removal, for example
the Grumman A-6 Intruder and also remember the Hollywood-ized ejection
of “Goose” and “Maverick” from their departed-from-controlled-flight
F-14A Tomcat in the movie Top Gun. Aircrew ejection through the canopy
is still the preferred way of rapid egress from a high performance
military jet or turboprop in motion. Ejecting from an aircraft is such a
violent event: 12+ instantaneous G-loads can be experienced during
ejection and don’t forget about the wind blast as well! In addition to
canopy piercers on ejection seats, some aircraft canopies feature what’s
called a miniature detonation cord (MDC). Found as a small length of
explosive cord placed on the canopy above the ejection seat and aviator,
the MDC is activated once an ejection sequence is initiated and results
by exploding upwards. The explosion shatters an exit hole large enough
through the canopy allowing the aircrew to “punch out” of their aircraft
and also decreases the risk of severe cuts and other injuries from
Plexiglass shards during ejection. (A-6 Intruder aircrew during Vietnam
and other conflicts such as the 1991 Persian Gulf war where the A-6 was
last flown, A-6 pilots and B/Ns were often injured ejecting through the
canopy. The A-6 canopy doesn’t employ MDC.) Aircraft that feature MDC
cords are the BAe Hawk/T-45 Goshawk, JAS39 Gripen, both JSF prototypes,
and Harrier for example.
I had some opinions of the Orion Models MDC decals, some good but a
few bad ones. Good: awesome idea! How come nobody thought of using vinyl
decals to reproduce this detail until now? Prior choices that we’ve had
are the photo-etch Eduard 48-046 Harrier detail set for the Monogram
kit; I don’t know if there’s a Hasegawa version so please inform me! The
other choice for putting MDCs on the Harrier canopy are the waterslide
decals found in the Hasegawa kits, Super Scale and Twobobs decal sheets.
One additional choice I did on the Monogram Harrier canopy was to flood
liquid mask on the clear canopy; since the MDC on the Monogram kit is a
raised “panel line” the liquid mask would not cover that portion
allowing me to airbrush Model Master enamel light sea gray on the
exposed part and all I had to do was peel away the mask once the paint
was dry and I’d have a painted MDC! Works great by the way!
Experience with the photo-etched variety found in the Eduard’s
Harrier set is that first one had to free the part from the fret then
clean up the attachment points with a needle file or sandpaper. Next,
you’d have to bend the part to fit the canopy and while doing so
scratching up the canopy in the act and in turn forcing you to polish
the clear plastic if you hadn’t done so already. It’s good to have a
spare canopy sometimes to avoid that trouble, right? After having done
so, how then to attach the photo-etch part: white glue (ex.
Kristal-Kleer) or Future floor polish? Yes and yes!
Waterslide decals from the above mentioned manufacturers are great
too but you’d have a clear carrier film in the clear plastic visible to
those afflicted with advanced modeler’s syndrome (AMS). Not only that
the aftermarket decals are so thin (except Hasegawa’s) that they tend to
fold over themselves and will tear when you’re trying (and cursing) to
unfold them. So what? Aren’t you listening? I have AMS, the chronic but
manageable kind! I will see the clear carrier film on your decaled
canopy! How about another alternative? Well, here it is!
The Orion Models’ MDC are also made in self-adhesive vinyl, that’s
the good part. Great: You get two MDCs per set in case you screw up like
I did. The decals are much tougher than waterslide decals although it’ll
still fold over itself (not good) and definitely will not scratch
plastic like a photo-etch part. Instructions are straightforward and
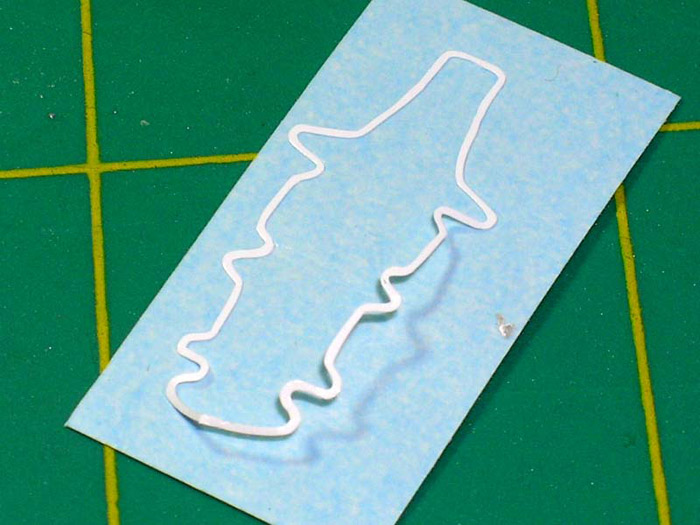
easy to follow: STEP 1. Peel away the excess vinyl carefully (and try to
leave it intact but don’t throw away the excess - more about that later)
and leave the MDC on the paper backing (photo 7). Be careful here and
work slowly to accomplish this task. STEP 2. Cut a piece of the included
transfer tape just barely large enough to cover the exposed MDC decal
then apply it to the MDC. STEP 3. The transfer tape will hold the MDC
decal while you peel away the original paper backing and allow you to
“transfer” the MDC to your canopy (photo 8 below). Neat huh?
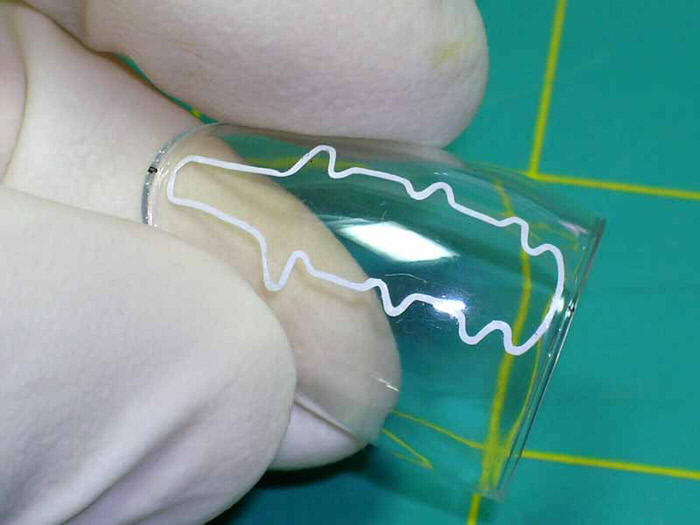
Photo 7. Excess vinyl
removed. Photo 8. Placing MDC using transfer tape.
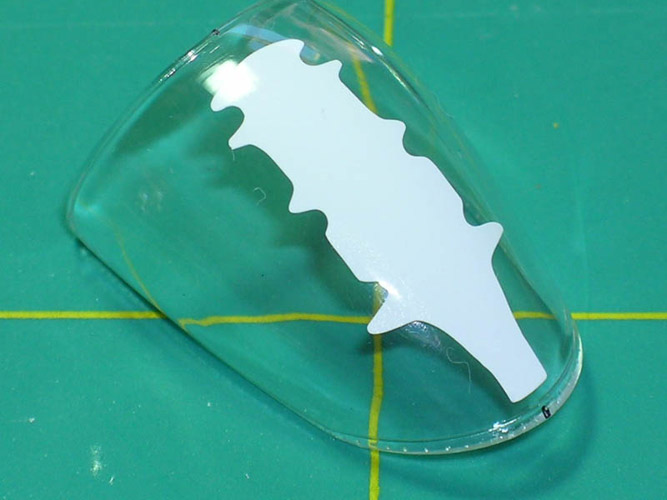
Photo 9. Excess vinyl still has a use!
Bad: Now before you apply the MDC decal to the canopy, did you mark
your centerline on the canopy so you know how to put the decal
correctly? No? Here’s a tip: use the excess vinyl decal you peeled away
in STEP 1 and apply it to the top of the canopy. You can use the outline
or silhouette of the MDC on the outside of the canopy as a guide and
adjust it all you want without ruining the actual and delicate MDC
before applying it to the inside of the canopy. That’s how I did my MDC
alignment (photo 9). TRUST ME! I’m saving you a session in cursing and
screwing up! I thought it was going to be an easy step applying the MDC
decal and also make sure to start at one end of the decal first. Oh
yeah, you’ll also need a third hand to hold the canopy too! Don’t ask me
where to find one!
I nearly gave up on this portion of the review thinking I’d have to
use the spare MDC that I was saving for another Harrier because I
screwed up trying to get the delicate MDC decal to attach using the
transfer tape. Bad: By the way, the transfer tape doesn’t have the
adhesive quality of 3M painter’s blue tape and it may leave some
adhesive residue on a nicely polished and Future-dipped canopy! The
residue was a pain to remove and removing it with a cotton cloth without
marring the three-day old Futured canopy caused another problem: static
that will attract lint! I hadn’t even gotten the MDC decal attached yet!
Eventually I got the decal attached correctly and without damaging the
canopy. However, I ended up stretching the MDC decal a few times during
my difficult and lengthy session; it took me an hour (very bad) to
finally get it attached the way I wanted using tweezers and a toothpick
and trying to keep the minute dust/lint particles from attacking my poor
decal! How I finally got the decal to look right (and lint free) applied
to the canopy was sheer luck and persistence in not giving up on an
otherwise unsalvageable first try (remember I had to save the spare for
my other Harrier at all costs!). Whew! Next time, I’ll polish my canopy
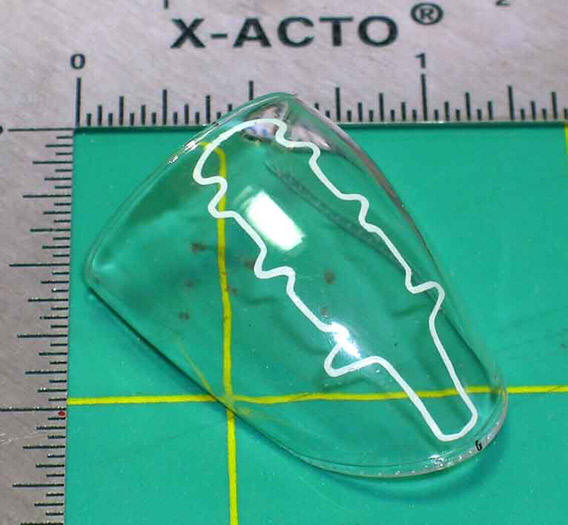
first, apply the decal, and then dip the canopy in Future. I should
mention that you do not have to paint the MDC decal. Although my
references show a grayish color for Harrier MDCs (think unpainted
Hasegawa gray plastic), the decal appears a passable light gray color in
my opinion. You can see for yourself in photo 10 – it looks great after
all.
I like the Harrier MDC decal from Orion Models even if I had trouble
with the application portion. Armed with experience with my first review
set, I’m sure my next try won’t be so difficult! It wasn’t the design of
the vinyl decals but the design of a curved canopy that nearly did me
in! For sure I will definitely be buying more of Orion Models’ Harrier
MDCs as I have about 10 Harrier kits waiting to be built! On a scale of
1 to 10 – 10 being the highest - I give the Harrier MDC a “9”.
Great job and great thinking Orion Models!
Thanks to Dave Roof of Orion Models for the review samples and for
producing these detail accessories when no other company has decided to
make them in this medium! Bravo! I highly recommend the vinyl decals for
the F-16, AV-8B, and F/A-18 to those of you who want to add just that
little bit of realism to your model jets. I just hope that Orion Models
will also produce MDC decals for the 1/48 Monogram AV-8A Harrier, Airfix
BAe Hawk, and Hasegawa T-4 Dolphin or the canopy lightning strips of the
F-14, Tornado, Mirage 2000, etc.!
Happy modeling!
References:
AV-8B Harrier II:
Review and Images Copyright © 2005 by
Ryan Fernandez
Page Created 14 September, 2005
Last updated 14 September, 2005
Back to HyperScale
Main Page
Back to Reviews Page
|
 Home |
What's New |
Features |
Gallery |
Reviews |
Reference |
Forum |
Search
Home |
What's New |
Features |
Gallery |
Reviews |
Reference |
Forum |
Search